Tuesday, December 15, 2009

How can we film time?

The San Francisco Mosaic film Project


Project Overview

This is an exciting project! Students will be asked to go out into the community to film their neighborhoods and stomping grounds as individuals and groups. As a class we will compile the video footage to create an artistic mosaic of our city. All video will have the sound extracted and manipulated with either fast edit or slow motion to create a visually stimulating journey through the city. Each student will be given all of the raw video and must then edit the video to create a short 3-5 minute film set to music with an individual theme that they choose.

Grading
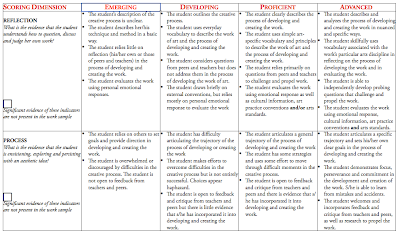
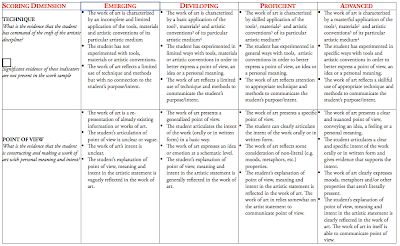
This is a Benchmark Portfolio project and completion of the project is mandatory in order to receive a passing grade. There will be six grades that encompass each category of the holistic rubric.

Goal
Students will explore framing video shots and thinking about angle, color, motion, movement, and sound to create mood and effect.

Use and set up video camera on a tripod
upload video clips
split clips
use video effect
time lapse and manipulate video
fade and blend music
create and use transitions
edit and snip video
create a Quicktime video

Friday, December 4, 2009

Exhibition Requirements


Digital Media Requirements for Exhibition, Thursday, December 10th

Two printed political stencil/ graphics
one with a positive message about the character
one with a message about your opponent or an event

1-2 minute video clip of their speech with the following:
1) 4 images total
2 stencils
1 graphics related to your character’s life/beliefs/work
1 portrait
2) “Ken Burns” effect is a must
3) Speech voice-over
4) Music must reflect your character
Corridas
trumpet or orchestra music
anthems


Presentation Requirements for the night of the Exhibition:
Introduction:
If in Ms. Motley’s class, introduce yourself (the character) in Spanish.
If not in Spanish, introduce yourself in character
Slideshow w/ speech voice-over
Explain the message in your stencils and why it is relevant to your character.
Explain why you chose the music you chose and how it’s relevant to your character.
Describe how and why you used the Ken Burns effect and why you chose to use the voice that you used. What were you trying to convey about yourself (the character)?
Describe the images that you chose to use and how it’s relevant to your character.

Checklist:
*Create slideshow and record voice-over.
*Write up your presentation on index cards.
*Rehearse, rehearse, & rehearse until you have your presentation memorized.
*Come to exhibition either dressed in character or in professional wear.

SSD will be next Wednesday from 12:45 – 2:45pm!!!

Thursday, November 12, 2009

Revolution Stencils/ graphics

How will my voice be heard?


Students will design political graphics. These political graphics should represent revolutionary ideas in simple yet powerful way. The premiss behind these graphics is to convey a message that clear, concise, and targets an audience. The final product should be no more than three colors, with a simple straight forward slogan.


Requirements:

  • Students will create two graphics, one about a current issue and another in reference to their role in the Mexican revolution which will be give in Social Studies.
  • Two tone or tritone only
  • Students must post the graphics to their blog
  • Complete artist statement


Guide

  • Know your audience and target them
  • Collaborate and ask others if the message is clear
  • Have a vision
  • Craft a compelling message either for or against something; Stop Bush’s War! or Housing is a Human Right
  • Writing needs to be clear and easy to read
  • Credit Photographer


Monday, November 9, 2009

Monday, October 26, 2009

Blog Thingamagigi

All student must maintain their own blogs. We will use Blogger.com to post our work and store reflections. Students should name their blog... firstnamelastname-digmedia.blogger.com

As of 11/8/09 student should post the following material:
  • Silhouette Collage and reflection
  • White back drop Portrait and reflection
  • Nike shoe design
  • Bio Keynote Quicktime
  • Music Video

Thursday, October 22, 2009

Video Project

Introduction to video
The Music Video

Project Overview
This is an introduction to video editing. You will be using Imovie HD to create one to two minute music videos. The videos are intended to show your ability to match up and time the lyrics of a song with the actual song. The lyrics should show up and be visible while the lyrics are being sung by the musician. Use different transitions to make the words appear. Be creative. 10th graders will also be expected to use images in their videos.

Grading
Grades will be based on the timing of the words with the music and the use of transitions, colors and imagery.


Goal
Students will complete a one to two minute video with lyrics that transition in creative ways along with the music of a song of their choice. Student will choose a song that is appropriate and fade out the end of the song. Students will understand how to:

upload music
split clips
fade music
create and transition titles
Add images
Edit images
Use the Ken Burns effect
Set timings
create a Quicktime video

Outcome
Students will post their finished quicktime video with a brief title and description to their blogs.
Students will have a basic understanding of video editing and be prepared for the next video project. Students will collaborate and work with one another to ensure that everybody has the skills to move forward.

Wednesday, October 21, 2009

Sample Artist Statement

In digital media class I created a silhouette collage. This assignment required me to take an actual silhouette photo. I then used Photoshop to add images that define the meaning of happiness to me. When Paul introduced the project to me I began thinking of the different images I could use and a position for my actual silhouette that would help define happiness. My intent was to have an image that included all the important things in my life as well as the fun stuff.


To start this project I worked with Smitty to take a photo using a digital camera. We used the white backdrop and two lights. The lights were placed behind me to create the bright background and the darkened silhouette of my body. I chose to do a hand stand because I am most happy when I’m upside down. I took about six pictures before I got one that was perfect.

To make the initial photo a perfect silhouette I had to make some adjustments using Photoshop. I used the levels tool to darken my body and lighten the background, then I used the magic wand to to select the body and blacken it. By darkening the body with the levels tool I was able to easily select it using the magic wand. I then selected the white background and I copied and pasted it in order to create a new layer. I now was ready to start inserting images.

I gathered my images and began pasting them between my two initial layers. I used a soft eraser brush to fade out the corner and edges of the images and blend them together. Each image was a new layer so I had to be careful to place the correct images on top of each other. Some images I didn’t blend, instead I just placed them on top of other images. I then used a dissolve paint brush to spay the outside of the silhouette to help emphasize the silhouette. Finally I found a series of quotes and and lyrics that define happiness in others words. I used Helvetica font in a variation of sizes and boldness to give it a uniform yet bold look.

Monday, October 19, 2009

Silhoutte Collage Artist Statement

What does Happiness Look like?

Silhouette Collage Artist Statement

Requirements
Five paragraph essay, you must include information on the process and the imagery you chose to use. This is a benchmark portfolio project and this reflection/ artist statement can be used for your Benchmark portfolio.

Outline

Introduction
Introduce your art piece. Explain in detail the assignment and the requirements. briefly describe the analog tolls you used (lights, camera, backdrop) and the digital programs you used to create your image (Firefox and Photoshop). What was your initial intent and how did this set the trajectory for this project.


Body Paragraph One How did you take the initial image?
Explain the process used to create the initial silhouette image. Describe how the lights and backdrop were incorporated into this process. Where were the lights placed and why. What pose did you chose and what is in the silhouette and why. Did you experiment in any way, describe in detail.


Body Paragraph Two How did you stack and blend images within the silhouette?
Describe in detail the process of creating the two color silhouette and the tools used. Then explain how you used layers to stack images, and the tools used. Whats types of blending did you do, and what types of tools you used? Explain how you experimented with photoshop and the tools you used. Explain the use of the text tool.

Body Paragraph Three What was the imagery you used and how does that describe happiness?
Describe your art piece. Explain the significance of the images you used and how they symbolize happiness. Explain why you used implicit or explicit images. what are the quotes you used and why.

Conclusion Final thoughts on the project
Evaluate your work using an emotional response. What was done well and what would you like to have done better. How might you use these tools in the future? Did you learn anything about happiness while working on this project.

Wednesday, September 30, 2009

What is Happiness?


What is happiness?

Project Overview
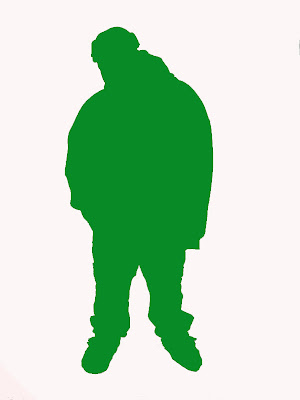
This project is intended to show an advanced level of digital photo manipulation. You will take silhouette pictures in studio, then fill the silhouette with things that you feel lead to happiness. On the outside of the silhouette you must include text that describes happiness. The text and imagery can be implicit or explicit.

Graduation Portfolio
A grade of 3 or Higher on the graduation Portfolio Rubric will qualify this assignment for the Envision Schools Benchmark Portfolio

Grading
Grades will be based on a visual appeal of the final image and the use of Photoshop layering tools to create images that blend into one another while maintaining contrast between the silhouette and the background text.

Expectations for project
Students will be expected to use most of the following tools;

Pen tool
magic wand
or magnetic lasso tool
Brushes, both soft and hard, with varying degrees of intensity
eraser
Layers
Opacity
Levels
Brightness/ Contrast
Text and Fonts
Crop
Paint brush
Clone Stamp
Color chooser
Gradient Tool


Benchmarks

Friday October 2nd Two Tone Silhouette

Friday October 9th Images blended and layered within the silhouette

Weds October 14th Final image is due with text layers surrounding the silhouette


Thursday, September 24, 2009

The Happiness Silhouette Collage


Happiness is a butterfly, which, when
pursued, is always just beyond your
grasp, but which, if you will sit down
quietly, may alight upon you.


The next project is an advanced Digital Imaging Project. Student will take silhouette pictures in studio, then they fill the silhouette with things that make them happy. On the outside of the silhouette they will write quotes and definitions of what happiness is and means. Look for benchmarks and Troubleshooting tips as this project progresses.

Monday, September 21, 2009

Color Test


Yes, They are Ugly, but that is not the point. You must create a pair of shoes using the PIG magazine templates that use at least four variations from each of the three primary colors, red, yellow and Blue that complement each other. You must also make sure that the complementary colors lay on opposite sides of the shoes and only complimentary colors should touch each other.

*Make sure that the hues you choose are consistent.


Nike Shoe Templates


Down load templates
http://cats3.es-cat.org/~pferraris/Dunkhi.zip
http://cats1.es-cat.org/~pferraris/Paul_Class.html/Dunklo.zip
http://cats1.es-cat.org/~pferraris/Dunkhi.zip

Friday, September 18, 2009

Portait Reflection

SAMPLE

One of the first assignment in Digital Media was to take professional portraits of ourselves using digital cameras, a white back drop and lights. We worked in groups of three and I traded off taking pictures and having pictures taken of me. I took pictures of _______________ and I shot the pictures from ___________________ in order to get an interesting perspective. This position was effective because ____________________. Triana took pictures of me, and I ___________________ because I thought I would look good in this position. I was very _________________
with the results.
The next step we took in order to complete this project was to use Photoshop to touch up and add borders to our portraits. But first we had to choose an image that would work best. I chose an image that had good colors and was properly exposed. I chose an image where I was ____________. Using the canvas tool I made the canvas a perfect square by adding to the _________________ of the image, I also matched the shade of white by using the color chooser. I then used the Dodge tool to blend the White background with the new canvas. Then I used the levels tool to enhance the colors. Finally, we used the canvas tool again to create a black border. Which framed the finished image.
I feel the portrait is __________________________________.

Tuesday, September 15, 2009

Thursday, September 3, 2009

Photography Unit


Studio photography Project. Each student will be required to use a Digital SLR to take photos. Each student will then use Photoshop to edit the photos. This is an introduction to Photoshop, lighting and digital photography.


Monday, August 24, 2009

What is Digital Media?


Welcome to Digital Media! I am very excited to get started with some fun and exciting projects. Please read through my syllabus before Wednesdays class.

The Syllabus For digital Media 09/10

[ES1] Paul Ferraris

pferraris@es-cat.org

Office hours are at lunch

Course Overview:

Digital Media Studies is a two-year course of study that provides students with a first-rate introduction to media literacy and digital media production. We will be studying different types of media in order to understand how their products are constructed and how they impact our lives. We will be using our understanding of how the mass media creates, distributes and exhibits its products to inform the production of our own digital media texts. Students will gain visual, verbal and written analytical skills and will become critical media practitioners.

Semester Coursework Outline:

Essential Question

Project

Outcomes

How does light create mood?

What is the digital darkroom?

ESGP

Student Studio portrait project. Students will use lights, photography and Photoshop to create emotion and mood.

Students first use an SLR camera a studio lights to create a silhouette of them. They then create layers within the image in Adobe Photoshop to create a collage within the silhouette.

Students will be able to articulate and interpret feelings through photography.

an advanced understanding of layers, blending, and masks.

Why do color and composition matter?

ESGP

Students will study color and composition and apply theory to a logo for themselves using Adobe Illustrator.

Students will use Nike shoe templates to design new colored and textured shoes.

Students should understand basic assumptions of the world that guide the design practice, and affect the arrangement of objects within a composition.

How are media texts constructed?

ESBP

Students will watch a news stories presented by multiple media sources, both print and from TV. Students will then be given a specific perspective in which to create two news casts about an event or series of events. Students will film a 2-4 minute segment. Students will then edit the newscast and add graphics and music.

Students will look at the Ruth Goldberg machine and create a short movie based on action and reaction

An understanding of how media influence our lives.

An understanding of angle, impact and video composition

Student should understand framing, continuity, sound and the editing process.

What goes into a house before it is a house?

Student will create use a Computer Aided Design program (CAD) to design blueprints for a home or building. Students will use an actual lot and design a home within the parameters of local building codes and restrictions.

Students will understand basic principles of home design.

Leadership Skills

Think Critically

Students will be challenged to think about media and its purpose.

Solving Problems

Students will be encourages to approach technology in unique ways.

Manage Projects Effectively

Collaborate Effectively

All work is project based and many assignments are group projects, students will be expected to actively participate in their group projects, and contribute to a timely completion.

Express Self Creatively

Students will always be pushed to think of new and unique ways of creating beautiful media projects.

Communicate Effectively & Persuasively

You will communicate through multiple media sources and using both visual and auditory senses.

Classroom Expectations

Be Creative

Be present

Help your classmates

Be respectful of the hardware

Don’t even think about eating or drinking anywhere near the computers

Have fun

Exhibitions

Digital Media Studies supports all of the Exhibitions throughout the school year. We will be incorporating the school-wide curricula into the DMS classes. One exhibition will be based around issues of media literacy.

Reflections

Each project and student will be required to keep an online blog or journal, and a paper back-up in their file, reflecting on their theoretical learning and the development of their practical productions. Journals will be reviewed and discussed in class.

My students have described me as “strict but nice.” I think you will enjoy this class.